Are Google Forms signatures legally binding? How Formesign meets the ESIGN Act
"Is a Google form or document considered a binding legal document for contract dispute resolutions?"- Quora
This is a common question from anyone signing agreements online. For example, if a contractor signs your NDA and later says "that wasn't me", your record has to hold up. The ESIGN Act says a contract can't be rejected just because it is electronic, but it expects intent to sign, consent, a signature tied to the record, an unchanged record, copies for everyone and record retention. Google Forms does not have a signature field and typed initials or an "I agree" checkbox in a Google Form prove very little. With Formesign, you can collect legally binding signatures in Google Forms and verify that a signed document has not been changed after it was signed.
Let's start. Create your form in Google Forms, then import it and follow the steps below.
Recently, I had to get a Non-Disclosure Agreement signed by a contractor and Google Forms was the obvious place to start, except Google Forms does not have a signature field. You can collect names, emails, file uploads and checkboxes, but there is no way for the person filling the form to actually sign anything.
The usual workarounds don't really solve the problem either. Some people add a file upload question and ask for a photo of the signature, but that just leaves an image sitting in a Google Sheet with no document attached to it. Some forms ask for typed initials or an "I agree" checkbox, which is fine for casual things but proves very little for an actual agreement. You could also export each response to a PDF and send it through a separate e-signature tool, which works, but then every single agreement needs manual work across two or three different tools. Moving to a completely different form builder is the other option and that means giving up Google Forms and everything already built there.
Formesign solves this directly within Google Forms. It embeds a signature pad, creates a signed PDF for every response, saves everything directly to Google Drive and gives you a clear audit trail to verify integrity later. That verification layer is what makes it a real signature rather than just an image file. We'll even test it later by editing a signed PDF to see if the system flags it. Let's dive in.
What makes a signature legally binding?
Before we get into the steps, a quick note on what makes an electronic signature legally binding in the first place.
In the US this is covered by the ESIGN Act, which has been around since the year 2000. The act says a contract cannot be rejected just because it is electronic, but there are conditions attached. Broadly, the law expects six things:
Intent to sign. The signer has to do something that clearly shows they meant to sign.
Consent to do business electronically.
The signature must be tied to the actual record, not stored somewhere separately.
Record integrity, meaning you should be able to prove the document was not changed after it was signed.
Everyone involved should get a copy of the signed document.
Record retention. The signed record has to be stored and stay reproducible later, so it can be pulled up again if there is ever a dispute.
If you are reading this from outside the US: the same idea applies at the state level through UETA, which 49 states plus DC have adopted (New York runs its own equivalent law) and in the EU and UK through the eIDAS regulation. The details differ but the conditions are broadly the same six.
These six points come up one by one during the tutorial, so keep them in mind.
Step 1: Create the Google Form
If you have already created your form in Google Forms, you can use it as is. Just copy the form link and head over to Formesign to import it and add a signature field, which we will do in Step 2. Alternatively, you can start from one of the pre-built Formesign templates and customize it to your needs.
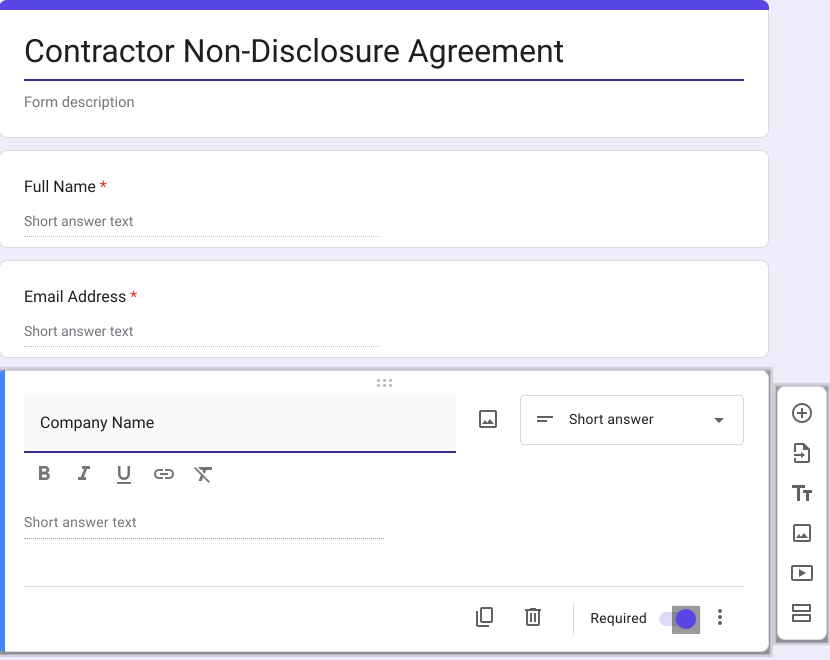
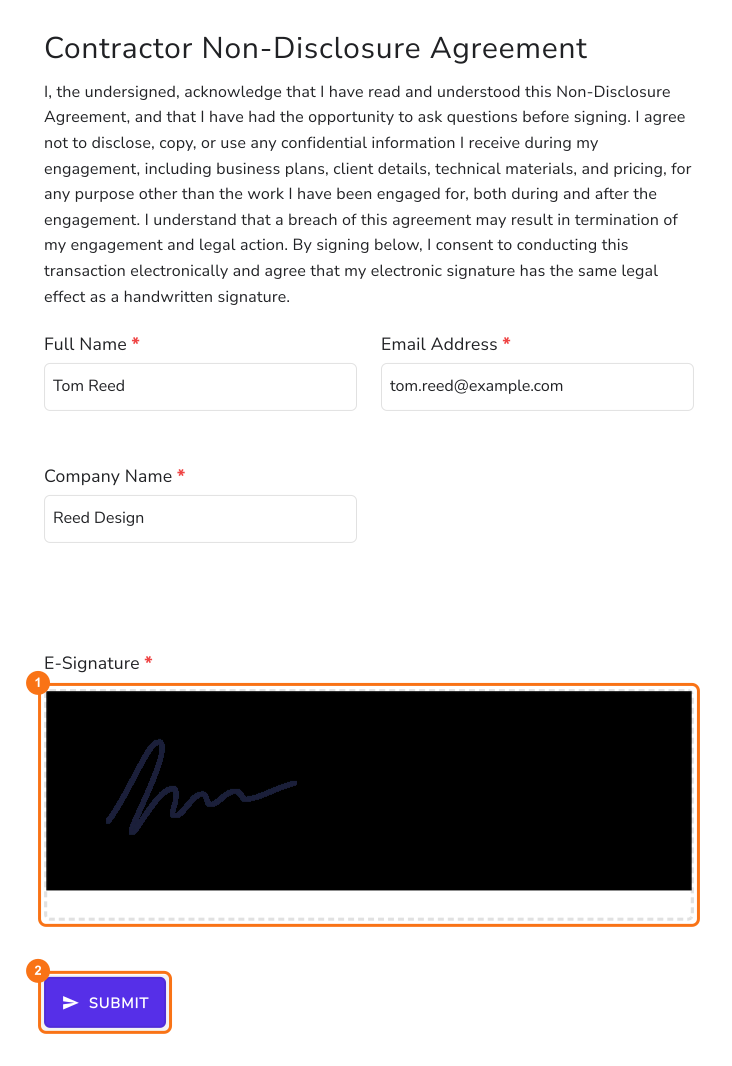
For this example, I set up a straightforward Contractor Non-Disclosure Agreement form with three fields:
Full Name
Email Address
Company Name
Notice there is no signature question in the Google Form itself. Formesign adds the signature block for you in the next step.
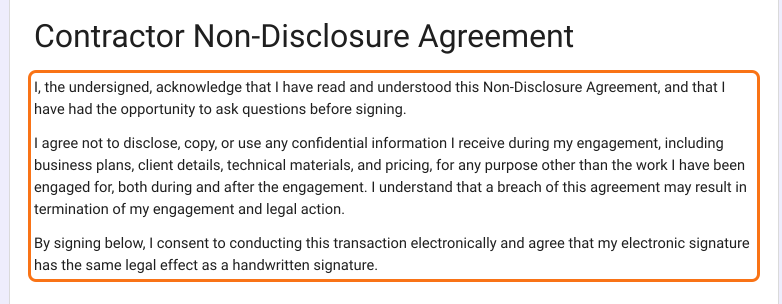
One more thing worth adding is the acknowledgement itself. In Google Forms, put the acknowledgement text in the form description, right below the form title, so it is the first thing the signer reads before filling in anything. Ours covers three things: that the signer has read and understood the agreement, that they agree not to disclose or misuse confidential information during and after the engagement and that they consent to signing electronically. That last line matters on its own, since consent to do business electronically is one of the six requirements from our list.
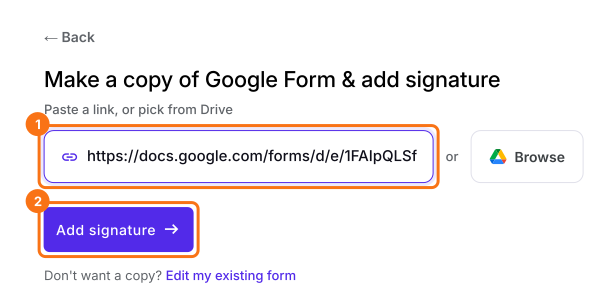
With the form created, head over to formesign.com, click Try it free and paste your Google Form link (or select it directly from Google Drive using the Browse button). Just make sure the form is published first.
After pasting the link, click Add signature. Formesign will process the form and ask you to choose the signature type and where it goes. Select Simple signature and click Next, then select the question it goes after and click Next and Formesign will add the signature block for you.
Step 3: Test the signature
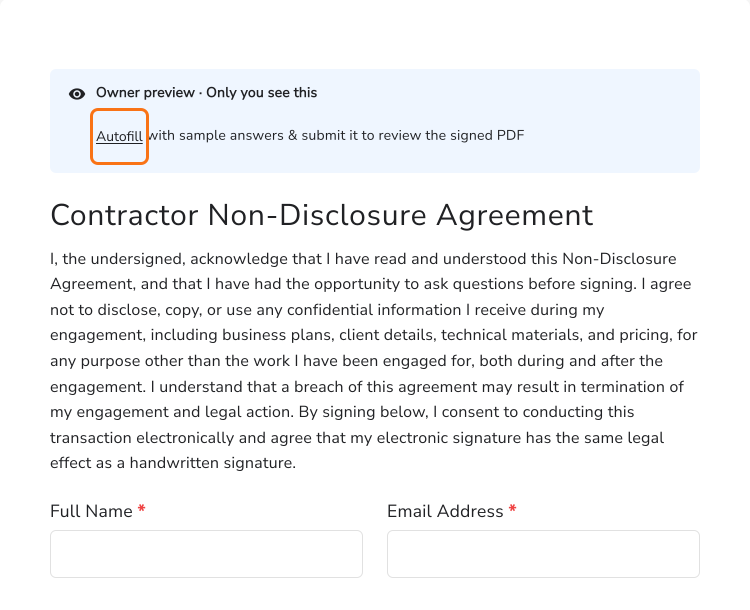
Once it finishes processing, you will see Your signing link is ready. Click Preview signing experience and a preview appears along with a note at the top that says Autofill so you can test out the workflow. Autofill puts in your own Google name and email.
One small tip before testing, check the form's theme. For serious documents like NDAs, the Minimal theme is a better fit. The colorful theme suits lead forms more. In my case, importing the form had set the colorful theme by default, so I switched it to Minimal. Saving a theme restyles every live form on your account, not only this one, so leave it if you have other live forms.
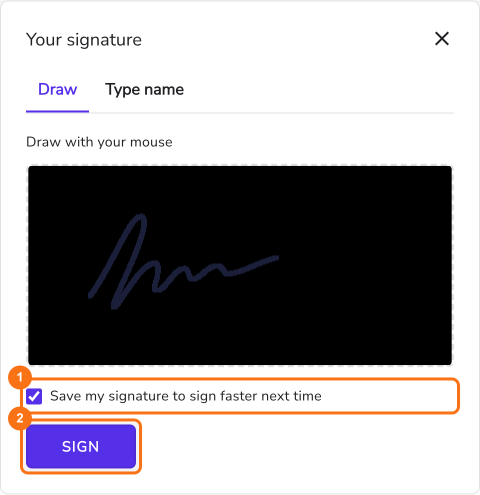
Drawing the signature by hand is key. It satisfies the first major requirement: demonstrating explicit intent to sign. Nobody accidentally draws a signature and the action is recorded with a timestamp.
You can draw and submit directly with Simple signature or sign in with your account with Verified signature. If you log in, Formesign shows a box to draw your signature, with the option: "Save my signature to sign faster next time". Doing this saves your signature for faster reuse next time.
The consent requirement, explicitly agreeing to conduct business electronically, is covered by the acknowledgement line you added in Step 1.
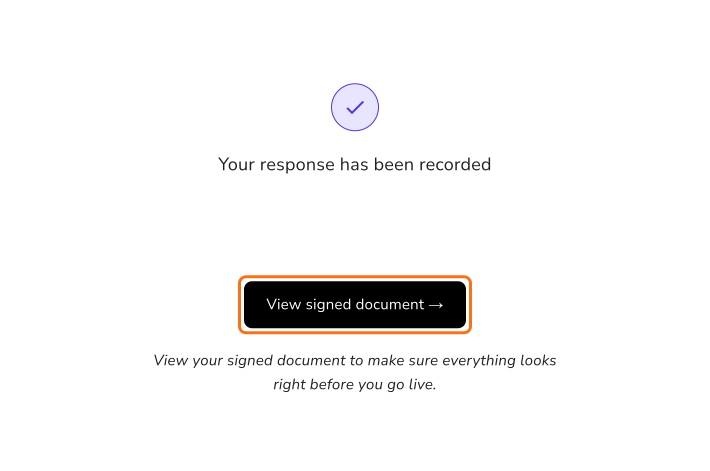
Once submitted, you'll see a confirmation message along with a button to View signed document. Only you see this button, in your preview. A real signer sees only the confirmation message.
Step 4: Look at the signed document
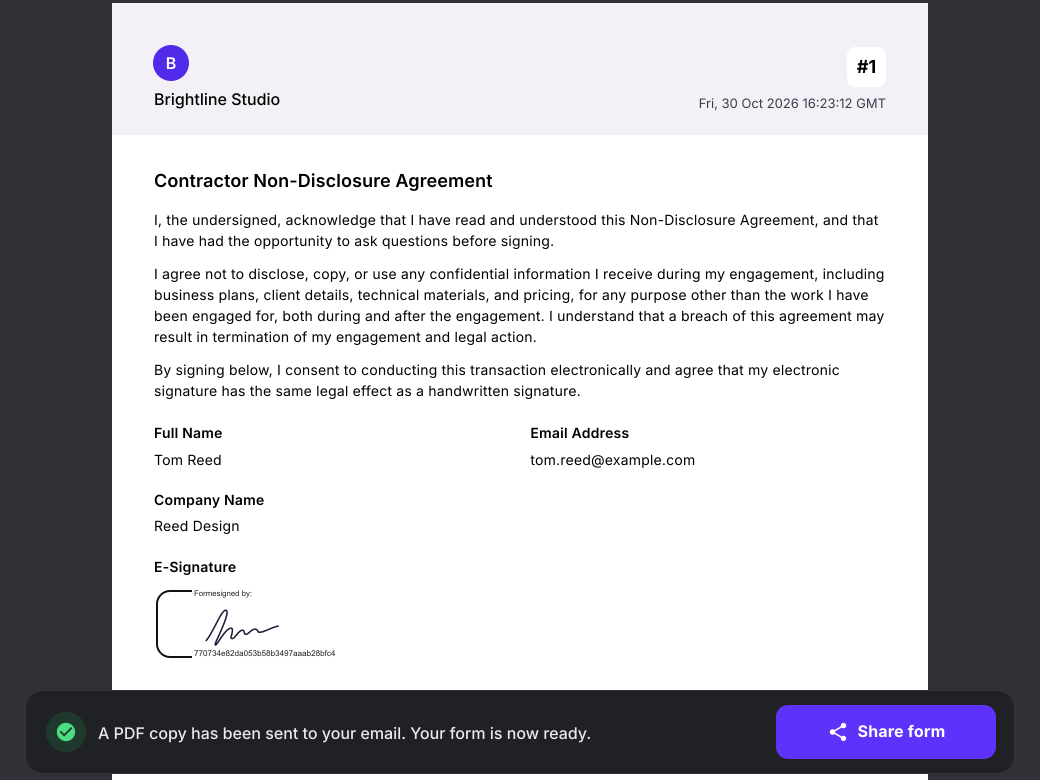
Clicking View signed document opens the generated PDF.
Here's a quick breakdown of what makes this PDF different from a standard document copy:
The submission details and drawn signature are embedded together in a dedicated "Formesigned by" block, accompanied by a unique tracking code under the signature. The acknowledgement section from the form appears here too, right alongside the responses, so the signer's stated intent and their consent to sign electronically are part of the signed record itself.
Every single page features a unique Envelope ID in the footer to ensure pages cannot be swapped or detached from the agreement.
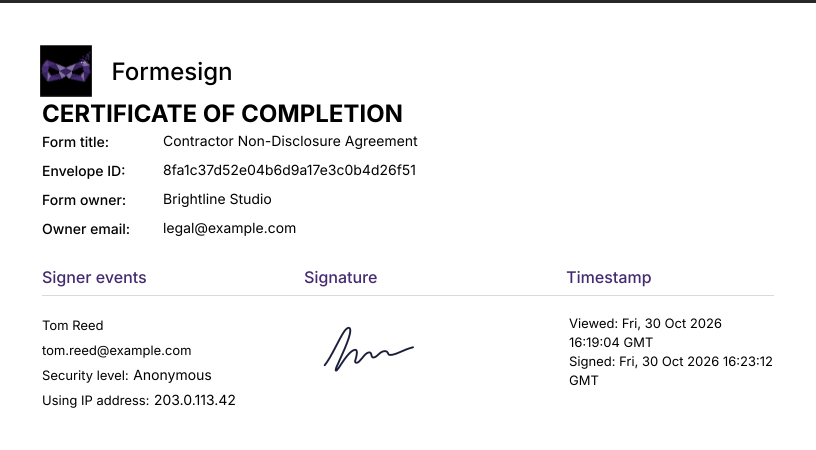
The final page acts as a full Certificate of Completion, detailing the form title, Envelope ID, signer's name, IP address and exact GMT timestamp of the signing.
The most common fight over any signed agreement is "that wasn't me." The Certificate of Completion is the direct answer to it: on one page it records who signed (name and email), from where (IP address) and exactly when (GMT timestamp). If a signer later denies signing, this page is what you point at.
This kind of evidence matters in practice. In IO Moonwalkers, Inc. v. Banc of America (2018), a business claimed it never signed its agreement. The North Carolina Court of Appeals held the company was bound anyway, because its later conduct showed it knew about the contract and acted under it. The e-signature audit trail played a key role in that finding: it showed the exact dates and times the documents were received, viewed and signed from the company's email, and against that record, the company's sworn statement that it had never seen the agreement was not enough. The audit trail did not decide the case on its own, but it is the evidence that made the company's denial impossible to sustain.
Step 5: Customize the letterhead and share the form
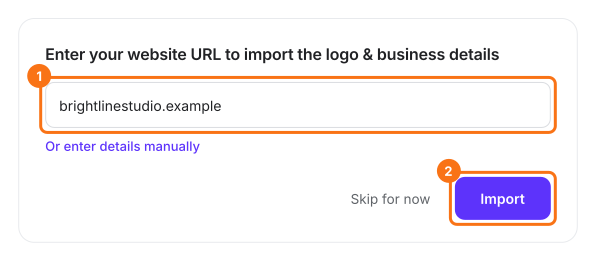
To brand the documents for your business, click the pencil icon, Edit logo and business name, on the signed document. Formesign lets you pull branding elements automatically from your website or enter details manually, including your company name, logo and phone number.
Once configured, click Share form and distribute the form link just as you would with any normal Google Form. Do Step 6 first, before your first real signer.
Step 6: The signed copies
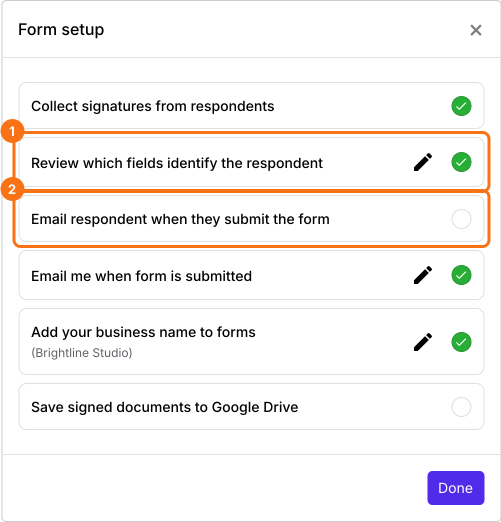
All the delivery settings live in one place. Click on the "Edit" tab, then click the tick icon, a small ring with a tick, next to the form name in the top left corner. This opens Form setup.
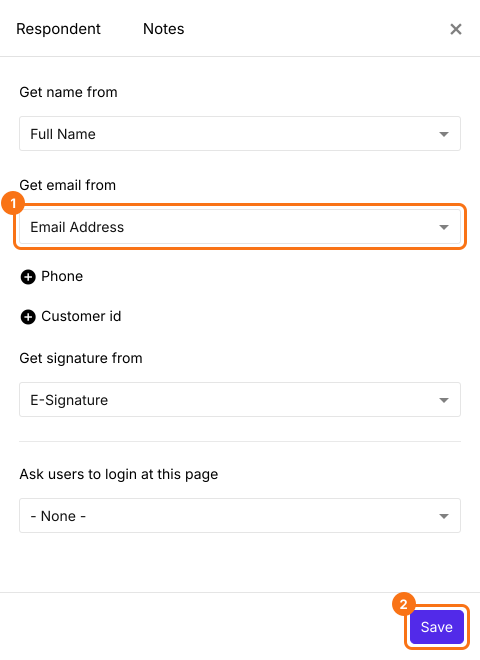
"Collect signatures from respondents" is already on. The setting we want is "Email respondent when they submit the form". First, click the pencil on "Review which fields identify the respondent". It opens the Respondent panel, where you tell Formesign which form fields identify the signer.
Go through the mappings here carefully. "Get name from" should point to Full Name and "Get signature from" to the E-Signature block. On my Simple signature form both were set to None, so select them. Until you do, the certificate has no name and the verify page says Signed by Anonymous. Then click + Email to show "Get email from" and select the Email Address field. This is the field we added back in Step 1 and without it selected here, Formesign has no address to send the signer's copy to. You can also map optional fields like phone or a customer id and there is an option to ask users to log in at a particular page if you want signers to be signed in. Click Save.
Back in Form setup, click the circle on "Email respondent when they submit the form" to turn it on, then click the circle on "Save signed documents to Google Drive". It opens Save to Google Drive: select the folder, click Next, keep Save Entire form response ticked, click Proceed and allow access when Google asks. "Email me when form is submitted" is already on and sends you, the owner, your copy with the response summary. "Save signed documents to Google Drive" keeps a copy of every signed PDF in your Drive, so the records survive even if an email gets deleted.
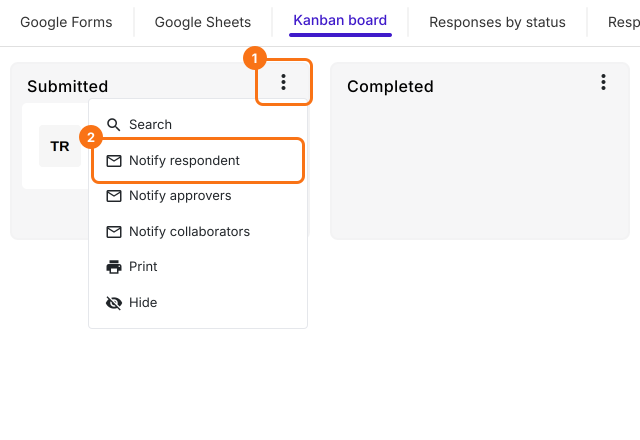
The signer's email has only the answers until you tick one more option, so the PDF goes with it. Click Done, click on the "Responses" tab, click Kanban board, click on the three dots for the Submitted column and click Notify respondent.
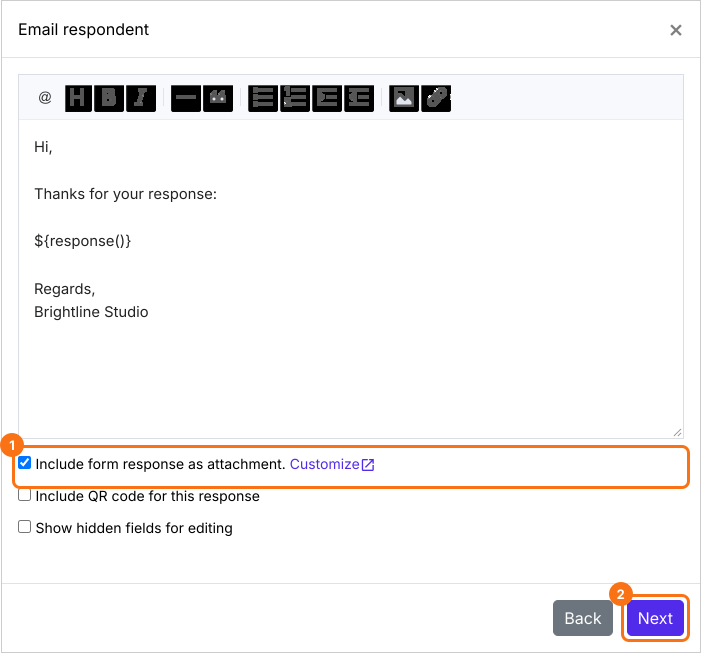
Keep the email address field and click Next, keep the subject and click Next, tick Include form response as attachment and click Next. When Test email notification is displayed, submit a test response and click YES.
One note if your form has a signature workflow with multiple signers, the respondent email goes out once everyone has signed and the final PDF is generated, so nobody receives a half-signed document.
This takes care of requirement number 5, copies to all parties, and requirement number 6, record retention: signed PDFs stay stored in Google Drive on your side and in each signer's inbox on theirs and any stored copy can later be checked against the original fingerprint, which is the next step.
Step 7: Verify the document
The final step is verifying record integrity: confirming whether an edited or tampered document can be detected after signing.
Formesign verifies files using SHA-256 digital fingerprinting. When a form is submitted, the unique cryptographic hash of the generated PDF is saved. If even a single character in the PDF changes later, the resulting hash changes completely. To verify any PDF, simply upload it at formesign.com/esign/verify.html (no account required).
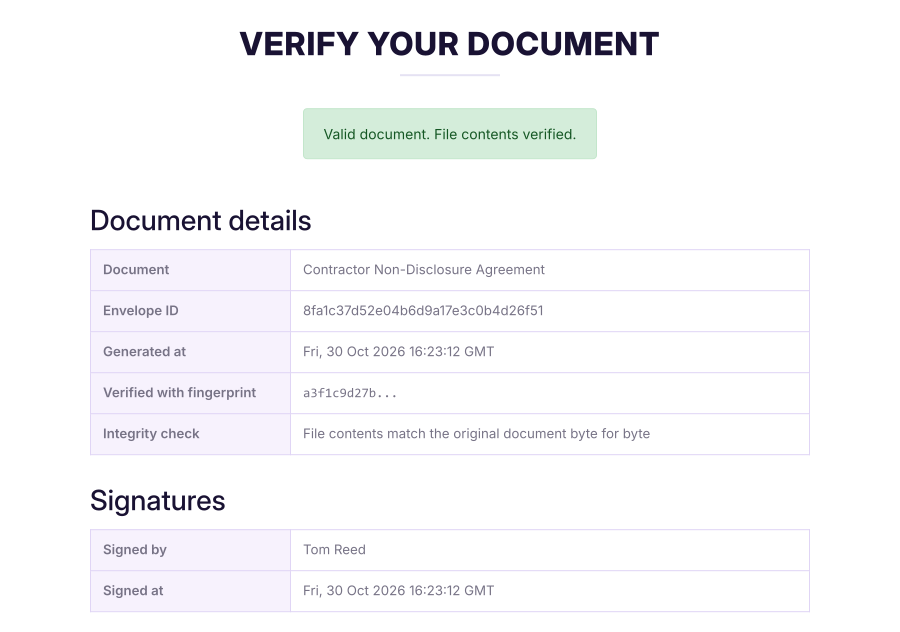
Testing an unaltered signed NDA returned a valid result, matching the original file byte-for-byte alongside timestamps and signer details.
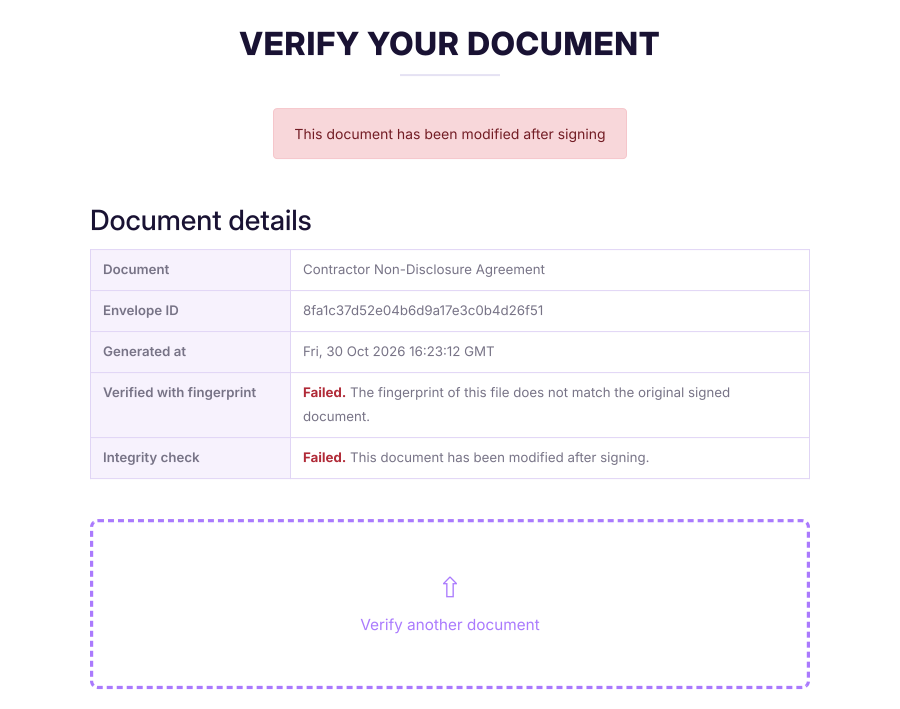
Testing an edited version (where text was altered in a PDF editor) resulted in an immediate failure. Even though visual signatures and Envelope IDs remained present, the fingerprint mismatch immediately flagged that the document had been modified post-signing.
The verify page found the Envelope ID, but the fingerprint did not match and it clearly says that the document has been modified after signing.
How Formesign meets each requirement
Before wrapping up, here is the full picture in one place: the six requirements from the start of this blog and where each one gets handled in the flow we just built.
Requirement
How Formesign handles it
Intent to sign
Hand-drawn signature, plus the acknowledgement statement written into the form (Steps 1 and 3)
Consent to do business electronically
Electronic-signing consent line in the acknowledgement (Step 1)
Signature tied to the record
Signature embedded in the PDF with a tracking code, Envelope ID on every page (Step 4)
Record integrity
SHA-256 fingerprint stored at signing, public verify page catches any edit (Step 7)
Copies to all parties
Owner and signer both get email copies, plus Google Drive storage, all from the Form setup options (Step 6)
Record retention
Signed PDFs stored in Drive and inboxes, reproducible and checkable against the stored fingerprint at any time (Steps 6 and 7)
Conclusion
That covers how to collect and verify legally binding signatures in Google Forms using Formesign. By combining signature collection, audit trails, automatic distribution and hash verification, you get a robust, enforceable workflow directly within Google Workspace.
To try out document verification yourself, test a form submission and upload the resulting PDF at formesign.com/esign/verify.html
Summary
If a contractor later denies signing your NDA, typed initials or an "I agree" checkbox in a Google Form prove very little. With Formesign, the acknowledgement records consent, the drawn signature shows intent, the signed PDF ties it to the record, Google Drive and email keep copies for everyone and the verify page shows nothing changed. Create your form in Google Forms, then import it and complete the steps above. If you have any questions, write to support.